Quantcast
Channel: Ashish Awasthi's Blog
Viewing all 165 articles
Browse latest View live

Send eMail and attachement from any SMTP server using JavaMail in Oracle ADF

$
0
0
The JavaMail API provides a platform-independent and protocol-independent framework to build mail and messaging applications- JavaMail API

This post is about sending eMail and attachments from any SMTP (Simple Mail Transfer Protocol) as Gmail or any other server (mail.awasthiashish.com)
You can read my previous post about mail integration with ADF that was specifically about using Gmail Server
Gmail Integration with Oracle ADF using Java Mail API

So all basic configuration is described in previous post , now in this post i am only writing a java method to send mail and attachments
Don't forget to download these 2 jar files
  1.mail.jar 2. Activation.jar- Download

Add both jar files to project library path and then use this method 

Helper method (JavaCode) to send simple eMail and eMail with attachment-

/**Method to send mail from any SMTP server using JavaMail API
* Provide Correct Parameters
* @return
* @param msg- Email Message Body
* @parsm subject- Subject of Email
* @param FromUser- Email Id of Sender
* @param ToUser- Email Id of Reciever
* @param pwd- Password of sender's email address
* @param hostName- Host Name of Mail server (smtp.gmail.com)
* @param isAnyAtchmnt- "Y" for yes there is an attachement and "N" for no attachment
* @param fileNamePath- abolute path of file on server if there is any attachement
*/
public String sendMail(String msg, String subject, String FromUser, String ToUser, String pwd, String hostName,
String isAnyAtchmnt, String fileNameNPath){

// Setting Properties
Properties emailProperties =new Properties();
emailProperties.put("mail.smtp.host", hostName);
emailProperties.put("mail.smtp.auth","true");
emailProperties.put("mail.smtp.starttls.enable","true");

//Login Credentials
final String user = FromUser;//change accordingly
final String password = pwd;//change accordingly

//Authenticating...
Session session = Session.getInstance(emailProperties,new javax.mail.Authenticator(){
public PasswordAuthentication getPasswordAuthentication(){
returnnewPasswordAuthentication(user, password);
}
});

//1) create MimeBodyPart object and set your message content
MimeMessage message =new MimeMessage(session);
try{
message.setFrom(new InternetAddress(user));

message.addRecipient(Message.RecipientType.TO,new InternetAddress(ToUser));

message.setSubject(subject);

BodyPart messageBody =new MimeBodyPart();

messageBody.setText(msg);

// If there is any attachment to send
if("Y".equalsIgnoreCase(isAnyAtchmnt)){
//2) create new MimeBodyPart object and set DataHandler object to this object
MimeBodyPart messageBodyPart2 =new MimeBodyPart();


System.out.println("Exact path--->"+ fileNameNPath);
DataSource source =new FileDataSource(fileNameNPath);
messageBodyPart2.setDataHandler(new DataHandler(source));
messageBodyPart2.setFileName(fileNameNPath);


//5) create Multipart object and add MimeBodyPart objects to this object
Multipart multipart =new MimeMultipart();
multipart.addBodyPart(messageBody);
multipart.addBodyPart(messageBodyPart2);

//6) set the multiplart object to the message object
message.setContent(multipart);
}
//If there is plain eMail- No Attachment
else{
message.setContent(msg,"text/html");//for a html email
}
}catch(MessagingException e){
}

Transport transport =null;


try{
transport = session.getTransport("smtp");
}catch(NoSuchProviderException e){
System.out.println("No such Provider Exception");
}

try{
transport.connect(hostName, FromUser, pwd);
transport.sendMessage(message, message.getAllRecipients());
transport.close();

System.out.println("Email sent successfully.");
return"Y";
}catch(MessagingException e){
System.out.println("Messaging Exception"+ e);
return"N";
}

}


Call this method in your ADF Application to send simple mail or mail with attachment, this is just like plug n play , provide correct parameters and use

Thanks :) Happy Learning

Setting view object bind variable (Override bindParametersForCollection, prepareRowSetForQuery, executeQueryForCollection )

$
0
0
Hello All,
This post is about a very basic question- How to set bind variable of a view object ?
and there are multiple posts about it that describes multiple ways to do this
Using setNamedWhereClause
Using VariableValueManager 
Using setter method in VOImpl class

But Sometimes we can not assign bind variable value in declarative way for first time execution as value source for bind variable is fixed but it's value may change at runtime from n number of events

So for this type of requirement we can set bind variable's value in such a way so that we need not to write code everywhere to set changed value.
See how can we do this -

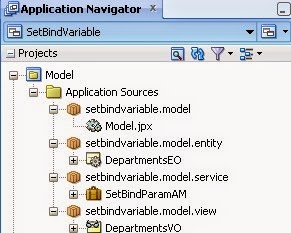
  • Create a Fusion Web Application and prepare model using Departments table of HR Schema


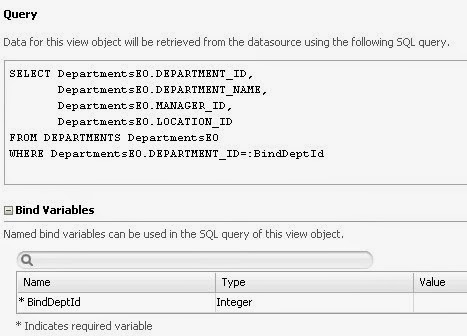
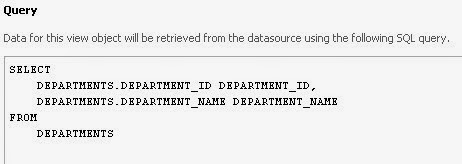
  • Open Departments viewObject add a bind variable in it's query , this bind variable is further used to set value and filter result set


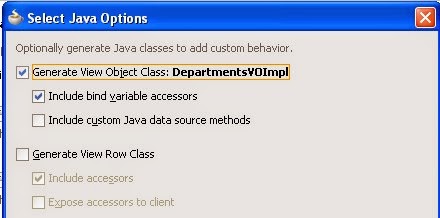
  • Create Java class for Department view object, goto java tab of Departments VO and click on edit icon of Java Classes and select "Generate ViewObject Class"


  • Now we can set bind variable's value by overriding 3 methods of DepartmentVOImpl class

1. Overriding bindParametersForCollection in ViewObject java class -

This method is used to set bind variable's value by framework, framework supplies an array of all bind variable to this method We can override this method to set value of bind variable ,
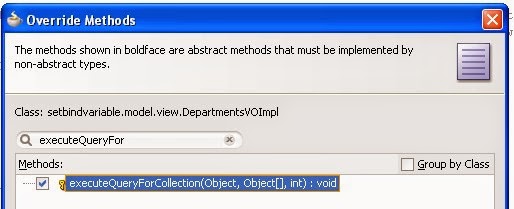
Open DepartmentVOImpl class and click on override methods icon on top of editor
It will open a window that consist all methods , search by name and click on ok


See the code in DepartmentVOImpl-


/**@override Method to set bind variable's value at runtime (Framework Internal Method)
* @param queryCollection
* @param object
* @param preparedStatement
* @throws SQLException
*/
protectedvoidbindParametersForCollection(QueryCollection queryCollection, Object[] object,
PreparedStatement preparedStatement)throws SQLException {
for(Object bindVar : object){
// Iterate over bind variable set and find specific bind variable
if(((Object[])bindVar)[0].toString().equals("BindDeptId")){
// set the bind variable's value
((Object[])bindVar)[1]=100;

}
}
super.bindParametersForCollection(queryCollection, object, preparedStatement);

}

2. Overriding prepareRowSetForQuery in ViewObject java class -

This method (introduce in 11.1.1.5 release) executes before bindParametersForCollection , same thing can also be done in this method 
Override method in Impl class 


See the Code in DepartmentsVOImpl-


/**@override Method to prepare RowSet for execution(Framework Internal Method)
* @param viewRowSetImpl
*/
publicvoidprepareRowSetForQuery(ViewRowSetImpl viewRowSetImpl){
//Set Bind Variable's value
viewRowSetImpl.ensureVariableManager().setVariableValue("BindDeptId",100);
super.prepareRowSetForQuery(viewRowSetImpl);
}

3. Overriding executeQueryForCollection in ViewObject java class -


This method invokes just before framework executes rowset , avoid setting bind varibale in this method because it is not called before some methods as getEstimatedRowCount(), So whenever you try to get rowcount it will return wrong values 
still it works and sets the bind varible value and executes rowset, again override method


See the Code in DepartmentsVOImpl-


/**Method to excute viewObject rowSet(Framework Internal Method)
* @param object
* @param object2
* @param i
*/
protectedvoidexecuteQueryForCollection(Object object, Object[] object2,int i){
for(Object bindVar : object2){
// Iterate over bind variable set and find specific bind variable
if(((Object[])bindVar)[0].toString().equals("BindDeptId")){
// Set the bind variable value
((Object[])bindVar)[1]=100;

}
}
super.executeQueryForCollection(object, object2, i);
}

Now use anyone of these methods to set bind variable value and run application module, check result
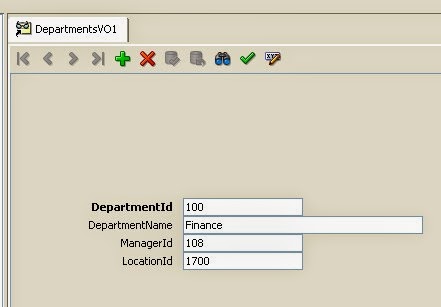
It is showing data for DepartmentId 100.

Thanks, Happy Learning :)

Show uploaded file (pdf/text/html/xml/image) content on page -Oracle ADF

$
0
0
Hello all
In previous post
Uploading and downloading files from absolute server path in Oracle ADF (12.1.3)
we saw that how can we upload any file to absolute server path and download same from there.
Uploading part is done using simple java code to write file to specified folder and downloading part is done using <af:fileDownloadActionListener>

Now in this post i am going to show that how can we display a file on page directly without downloading it.
So for this i am using same sample application that i have used in previous post , you can download it from here
See the additional steps to show file content on page-
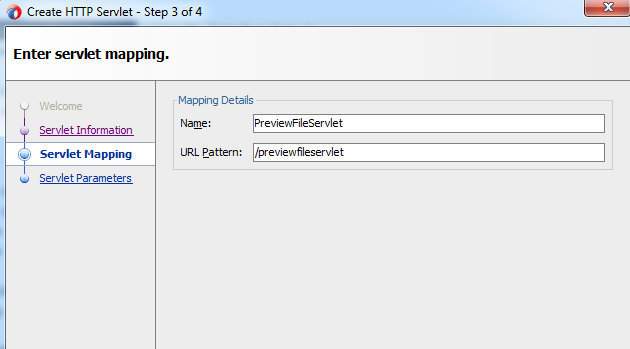
  • Create a servlet to parse file into output stream , this output stream will be used to show file content further.
    To create servlet right click on viewController project select New--->From Gallery-->Web Tier-->Servlet


  • See servlet source code to parse file into outputStream

  • importjava.io.BufferedInputStream;
    importjava.io.File;
    importjava.io.FileInputStream;
    importjava.io.IOException;
    importjava.io.InputStream;
    importjava.io.OutputStream;
    importjava.io.PrintWriter;

    importjavax.servlet.*;
    importjavax.servlet.http.*;

    publicclassPreviewFileServletextends HttpServlet {
    privatestaticfinal String CONTENT_TYPE ="text/html; charset=UTF-8";

    publicvoidinit(ServletConfig config)throws ServletException {
    super.init(config);
    }

    /**
    * @param request
    * @param response
    * @throws ServletException
    * @throws IOException
    */
    publicvoiddoGet(HttpServletRequest request, HttpServletResponse response)throws ServletException, IOException {
    String path =(request.getParameter("path"));

    OutputStream os = response.getOutputStream();
    //If path is null
    if(path.equalsIgnoreCase("No")){
    path ="D:\\Document\\ItemImage\\Item.jpg";
    }
    if(request.getParameter("path")==""){
    path ="D:\\Document\\ItemImage\\Item.jpg";
    }
    InputStream inputStream =null;

    try{
    File outputFile =new File(path);
    inputStream =new FileInputStream(outputFile);
    BufferedInputStream in =new BufferedInputStream(inputStream);
    int b;
    byte[] buffer =newbyte[10240];
    while((b = in.read(buffer,0,10240))!=-1){
    os.write(buffer,0, b);
    }

    }catch(Exception e){

    System.out.println(e);
    }finally{
    if(os !=null){
    os.close();
    }
    if(inputStream !=null){
    inputStream.close();
    }

    }
    }
    }

  • Now open page in editor and drop an af:inlineFrame from component palette . inlineFrame is used to create a frame to show any external page or document just like as HTML iframe , it is loaded from source attribute
    So here i am using servlet as source attribute for this inlineFrame

  • <af:inlineFrameid="if2"
    source="/previewfileservlet?path=#{bindings.Path.inputValue == null ? 'No' : bindings.Path.inputValue}"
    inlineStyle="height:350px;width:800px;"sizing="preferred"/>

    here path of document is added to pageDef bindings that is passed to servelt as parameter

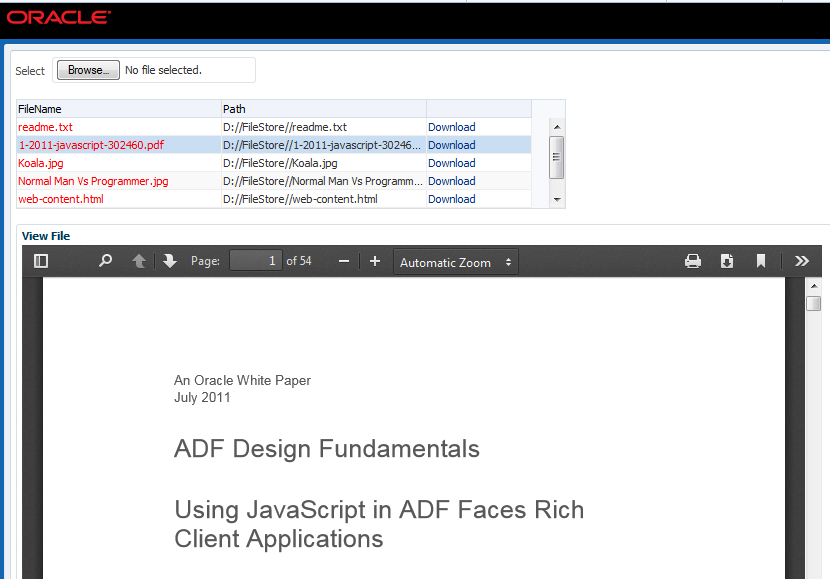
  • Now run this application and check it

    View Text File-
          View PDF File-


Thanks, Happy Learning :)

Post Related to file handling in Oracle ADF- 

Uploading and showing image file from absolute server path -Orace ADF
Exporting viewObject data in text file using af:fileDownloadActionListener in Oracle ADF (12.1.3)
Creating pdf file using Apache PDFBox API in ADF Faces and opening it in new window -Oracle ADF
Download file from url using Oracle ADF & Java- Download Manager
Reading html source of a webpage (url) using Oracle ADF (af:richTextEditor) & Java

    ADF Basics: Set multiple LOV's on attribute and conditionally switch using LOV Switcher

    $
    0
    0
    This post is about a very basic and common use case
    Suppose we have to show different values in our List depending on some condition but all values must be stored in same attribute so for this type of requirement ADF BC framework provides concept of LOV Switcher
    Framework allows us to define multiple LOV on same attribute, I hope you all know about defining LOV(List of Values) so move ahead and see how to use lov switcher

     See the implementation part-
    • Created a Fusion Web Application and a viewObject to show LOV on viewport (Used dual to create view object for this example , you can use use your own)


    • Created 2 more viewObject to apply LOV on first viewObject's attribute, One ViewObject is for Departments and other one is for Employees


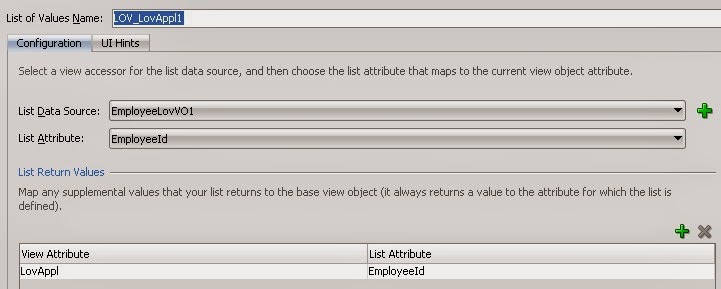
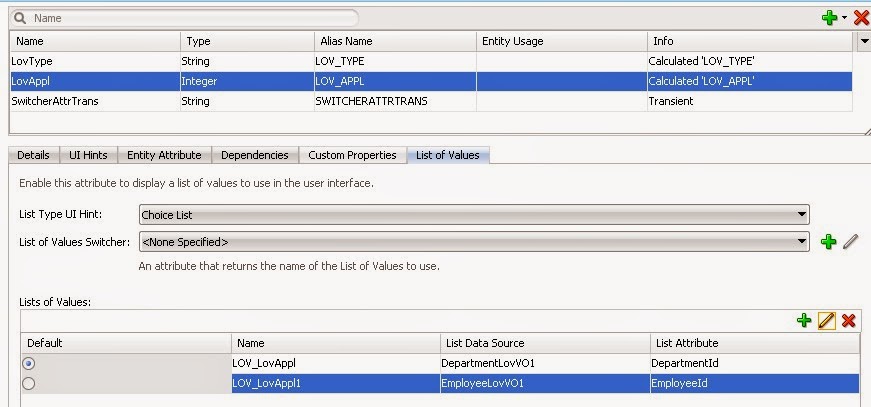
    • Open dual viewObject select LovAppl attribute and goto ListOfValues tab and add both LOV
      For Department - DepartmentId is List Attribute and DepartmentName will be shown on UI


    • For Employees- EmployeeId is List Attribute and FirstName,LastName will be shown on UI


    • Now click on green plus icon of List Of Values Switcher and add a transient attribute , this will be further used to switch lov on base of some condition


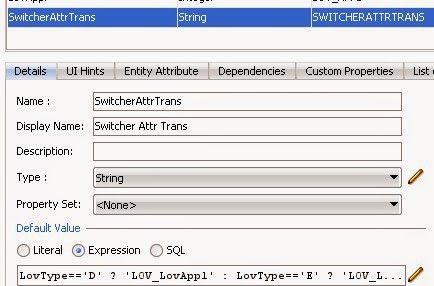
    • So created LovSwitcher attribute , and remember this switcher attribute value should be one of the LOV Name that are applied on attribute.
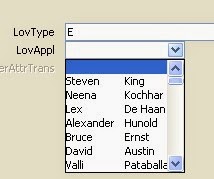
      Here i am using a condition - if LovType attribute of Dual viewObject is 'D' the LovAppl should show Departments Lov and if it is 'E' then LovAppl should show Employees Lov
      For this i have written expression for lov switcher attribute
      LovType=='D' ? 'LOV_LovAppl' : LovType=='E' ? 'LOV_LovAppl1' : null


    • Now run Application Module and check it


    Thanks , Happy Learning :)

    Better UI for data collection using af:listView, Enable selection in ADF Faces List component

    $
    0
    0
    af:listView is a new component introduced in Jdev 12C to show tabular data (rows of a collection), it uses same configuration as af:table
    In this post i will be describing- how to create af:listView using ADF business component and  how we can enable selection in af:listView

    Let's start
    How to create af:listView using ADF BC-
    • Created a Fusion Web Application and prepared model using Departments table of HR Schema


    • drop Departments viewObject on page from DataControl as ADF List View


      Configuration Wizard for List is opened, set the appropriate layout


      Set the value binding that we want to show on page


      After this we can customize layout on page also, we can change color, style width etc;
      see XML source of af:listView-

      <af:listViewvalue="#{bindings.Departments1.collectionModel}"var="item"
      emptyText="#{bindings.Departments1.viewable ? 'No data to display.' : 'Access Denied.'}"
      fetchSize="#{bindings.Departments1.rangeSize}"id="lv1">
      <af:listItemid="li1">
      <af:panelGroupLayoutlayout="horizontal"id="pgl1">
      <f:facetname="separator">
      <af:spacerwidth="10"id="s1"/>
      </f:facet>
      <af:outputFormattedvalue="#{item.bindings.DepartmentId.inputValue}"id="of1"
      inlineStyle="font-weight:bold;font-size:medium;color:red;">
      <af:convertNumbergroupingUsed="false"
      pattern="#{bindings.Departments1.hints.DepartmentId.format}"/>
      </af:outputFormatted>
      <af:outputFormattedvalue="#{item.bindings.DepartmentName.inputValue}"id="of2"
      inlineStyle="font-weight:bold;font-size:small;color:navy;"/>
      </af:panelGroupLayout>
      <af:panelGroupLayoutid="pgl2">
      <af:outputLabelvalue="Manager id"id="ol1"/>
      <af:outputFormattedvalue="#{item.bindings.ManagerId.inputValue}"id="of3">
      <af:convertNumbergroupingUsed="false"
      pattern="#{bindings.Departments1.hints.ManagerId.format}"/>
      </af:outputFormatted>
      <af:spacerwidth="10"height="10"id="s2"/>
      <af:outputLabelvalue="Location Id"id="ol2"/>
      <af:outputFormattedvalue="#{item.bindings.LocationId.inputValue}"id="of4">
      <af:convertNumbergroupingUsed="false"
      pattern="#{bindings.Departments1.hints.LocationId.format}"/>
      </af:outputFormatted>
      </af:panelGroupLayout>
      </af:listItem>
      </af:listView>


      and how it looks on page- hmmm better than af:table


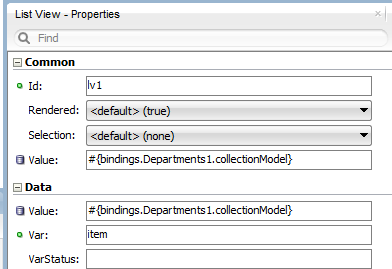
    • By default adf listView doesn't support selection, you can see Selection property is set to none. it shares same configuration as af:table , you can see that value property is bound to #{bindings.Departments1.collectionModel} and attributes are populated using variable reference of this collection


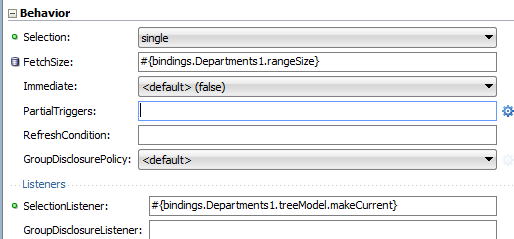
    • To enable selection just set Selection to single and in selectionListener property of list set #{bindings.Departments1.treeModel.makeCurrent}


    • Now Run this application and check, single selection is enabled
     Thanks, happy learning :)

      Custom selection listener for af:listView, Invoke selectionListener programmatically

      $
      0
      0
      In the last post (Better UI for data collection using af:listView, Enable selection in ADF Faces List component ) about af:listView, we saw that how can we present data collection in a better way using af:listView and enable selection using EL (same as used for af:table)

      Now in this post i will describe about defining custom selection listener for af:listView
      Suppose you have to do some task on selection of an item in list other than making it current row, for this you have to override default selection listener and define own custom selection listener in managed bean
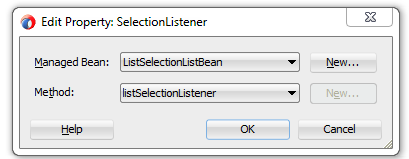
      So next step is to define a method in managed bean for handling selection event of af:list view
      • Select af:listView, goto properties and click on edit menu of selectionListener property and create a method in managed bean


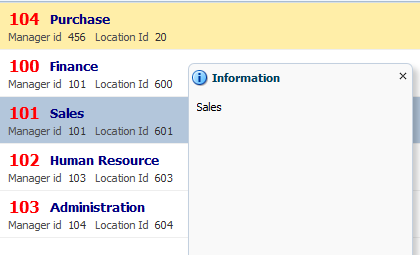
      • now see what we have to do in custom selection listener, first invoke default selection listener EL (#{bindings.Departments1.collectionModel.makeCurrent}) to make selected row as current and then get current row from iterator as selected row is now current row
        See the managed bean code -

      • //Import these packages

        importjavax.el.ELContext;
        importjavax.el.ExpressionFactory;
        importjavax.el.MethodExpression;
        importjavax.el.ValueExpression;

        importjavax.faces.application.FacesMessage;
        importjavax.faces.context.FacesContext;

        importoracle.jbo.Row;

        importorg.apache.myfaces.trinidad.event.SelectionEvent;


        /**
        * Programmatic invocation of a method that an EL evaluates to.
        *
        * @param el EL of the method to invoke
        * @param paramTypes Array of Class defining the types of the parameters
        * @param params Array of Object defining the values of the parametrs
        * @return Object that the method returns
        */
        publicstatic Object invokeEL(String el, Class[] paramTypes, Object[] params){
        FacesContext facesContext = FacesContext.getCurrentInstance();
        ELContext elContext = facesContext.getELContext();
        ExpressionFactory expressionFactory = facesContext.getApplication().getExpressionFactory();
        MethodExpression exp = expressionFactory.createMethodExpression(elContext, el, Object.class, paramTypes);

        return exp.invoke(elContext, params);
        }

        /**
        * Programmatic evaluation of EL.
        *
        * @param el EL to evaluate
        * @return Result of the evaluation
        */
        publicstatic Object evaluateEL(String el){
        FacesContext facesContext = FacesContext.getCurrentInstance();
        ELContext elContext = facesContext.getELContext();
        ExpressionFactory expressionFactory = facesContext.getApplication().getExpressionFactory();
        ValueExpression exp = expressionFactory.createValueExpression(elContext, el, Object.class);

        return exp.getValue(elContext);
        }

        /**Custome Selection Listener for af:listView
        * @param selectionEvent
        */
        publicvoidlistSelectionListener(SelectionEvent selectionEvent){
        //invoke this EL to set selected row as current row, if it is not invoked then first row will be current row
        invokeEL("#{bindings.Departments1.collectionModel.makeCurrent}",new Class[]{ SelectionEvent.class},new Object[]{
        selectionEvent });
        // get the selected row , by this you can get any attribute of that row
        Row selectedRow =(Row) evaluateEL("#{bindings.Departments1Iterator.currentRow}");
        FacesMessage msg =new FacesMessage(selectedRow.getAttribute("DepartmentName").toString());
        msg.setSeverity(FacesMessage.SEVERITY_INFO);
        FacesContext.getCurrentInstance().addMessage(null, msg);
        }

      • Now run application and check

      Download Sample ADF Application here
      Thanks , Happy Learning :)

      Working with af:iterator and af:forEach programmatically (Populate values using POJO from Managed Bean)

      $
      0
      0
      This is another post about Working programmatically with ADF (populating af:iterator and af:forEach programmatically )
      previously i have posted about populating af:iterator and af:forEach using ADF BC and binding layer to show master-detail relation
      Implementing master/detail tree relation using af:Iterator and af:forEach for better UI designs - Oracle ADF

      For this post i am populating employee name and it's department name using List datastructure ,to get and set value of attributes , created a java bean class , it has 2 variable for both attributes


      publicclassEmployeeDet{
      publicEmployeeDet(String name, String deptName){
      this.name= name;
      this.deptName= deptName;
      }
      //Attribute to display EmployeeName and Department Name
      private String name;
      private String deptName;

      publicvoidsetName(String name){
      this.name= name;
      }

      public String getName(){
      return name;
      }

      publicvoidsetDeptName(String deptName){
      this.deptName= deptName;
      }

      public String getDeptName(){
      return deptName;
      }
      }

      Next step is to create a managed bean to populate data in af:iterator and af:forEach , this managed bean makes use of
      EmployeeDet
      java bean class to add data in same format for all items of iterator and forEach. A List data structure is used to pass all values to iterator. See code of managed bean 


      //Constructor-populate default records
      publicPopulateIteratorBean(){

      EmployeeDet obj =new EmployeeDet("Ashish Awasthi","Oracle ADF");
      employeeDetail.add(obj);
      obj =new EmployeeDet("Alex Smith","Java");
      employeeDetail.add(obj);
      obj =new EmployeeDet("James S","PHP");
      employeeDetail.add(obj);
      }
      //ArrayList to poplate data in af:iterator and af:forEach
      private List<EmployeeDet> employeeDetail =new ArrayList();

      publicvoidsetEmployeeDetail(List<EmployeeDet> employeeDetail){
      this.employeeDetail= employeeDetail;
      }

      public List<EmployeeDet>getEmployeeDetail(){

      return employeeDetail;
      }

      Now drop af:iterator on page and set it's properties like value, var etc


      using var reference ofiterator , set value in output text to show Employee Name and DepartmentName , see XML source of af:iterator


      <af:panelGroupLayoutid="pgl1"layout="horizontal">
      <af:iteratorid="i1"value="#{viewScope.PopulateIteratorBean.employeeDetail}"var="item">
      <af:panelBoxid="pb2"showDisclosure="false">
      <f:facetname="toolbar"/>
      <af:panelGroupLayoutid="pgl3"layout="horizontal">
      <af:outputTextvalue="#{item.name}"id="ot1"
      inlineStyle="font-weight:bold; font-size:medium; color:#0572ce;;"/>
      <af:spacerwidth="2"height="0"id="s1"/>
      <af:outputTextvalue="(#{item.deptName})"id="ot2"
      inlineStyle="font-weight:bold;font-size:small;color:red;"/>
      </af:panelGroupLayout>
      </af:panelBox>
      </af:iterator>
      </af:panelGroupLayout> 

      on running it looks like this-


      do same for af:forEach


      <af:panelGroupLayoutid="pgl2"layout="horizontal">
      <af:forEachitems="#{viewScope.PopulateIteratorBean.employeeDetail}"var="feach">
      <af:showDetailHeadertext="#{feach.deptName}"disclosed="true"id="sdh1">
      <af:outputTextvalue="#{feach.name}"id="ot3"
      inlineStyle="font-weight:bold; font-size:medium; color:#0572ce;;"/>
      </af:showDetailHeader>
      </af:forEach>
      </af:panelGroupLayout>

      on running it looks like this-
       Sample ADF Application-Download
      Thanks, Happy Learning :)

      Working with af:iterator and af:forEach programmatically (Add and delete records using List)

      $
      0
      0
      In previous post Working with af:iterator and af:forEach programmatically (Populate values using POJO from Managed Bean) we saw that how can we populate record from a List to af:iterator and af:forEach (ADF Faces Component)

      So this post is about adding and deleting of records from List while List is presented using af:iterator.
      here i am extending previous post and using same sample application

      Added two fields and button on page to add records 


      <af:panelFormLayoutid="pfl1"rows="1">
      <af:inputTextlabel="Name"id="it1"binding="#{viewScope.PopulateIteratorBean.nameBind}"/>
      <af:inputTextlabel="Department"id="it2"binding="#{viewScope.PopulateIteratorBean.deptNameBind}"/>
      <af:buttontext="Add"id="b1"
      actionListener="#{viewScope.PopulateIteratorBean.addNewRecordAction}"/>
      </af:panelFormLayout>


      and on this button action simply added both attributes to List and added partial trigger of button to af:iterator to refresh it


      // Component binding to access inputValue from page

      private RichInputText nameBind;
      private RichInputText deptNameBind;

      publicvoidsetNameBind(RichInputText nameBind){
      this.nameBind= nameBind;
      }

      public RichInputText getNameBind(){
      return nameBind;
      }

      publicvoidsetDeptNameBind(RichInputText deptNameBind){
      this.deptNameBind= deptNameBind;
      }

      public RichInputText getDeptNameBind(){
      return deptNameBind;
      }

      /**Method to add record in List and show on page using af:iterator and af:forEach
      * @param actionEvent
      */
      publicvoidaddNewRecordAction(ActionEvent actionEvent){
      if(nameBind.getValue()!=null&& deptNameBind.getValue()!=null){
      EmployeeDet obj =new EmployeeDet(nameBind.getValue().toString(), deptNameBind.getValue().toString());
      employeeDetail.add(obj);

      }
      }


      On page - add a new record (record added in List and appeared in iterator as well)


      So it is quite simple to add records but deletion of record is a bit tricky but not difficult at all :)
      Let's see this-
      For deleting record i have added a delete link inside iterator so that it should appear for each record as you can see in snap (above)
      Here question is that how to know that which record should be deleted  ?

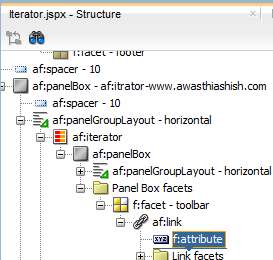
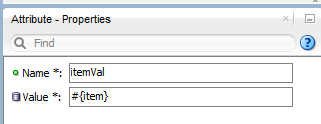
      So for this i have added a f:attribute tag to link , this attribute contains the value of current item of iterator


      f:attribute derives it's value from var of af:iterator/af:forEach, this var represents each item of List
      Now on delete button's action - get the current item and remove it from List


      /**Method to delete selected record
      * @param actionEvent
      */
      publicvoiddeleteRecordAction(ActionEvent actionEvent){
      //Get value from f:attribute (current item)
      Object itemVal= actionEvent.getComponent().getAttributes().get("itemVal");
      //Remove selected item from List
      employeeDetail.remove(itemVal);
      }

      After deleting records

      Sample ADF Application- Download

      Disable(Override) browser back button functionality in ADF Application using JavaScript

      $
      0
      0
      This is another JavaScript trick to disable browser back button functionality
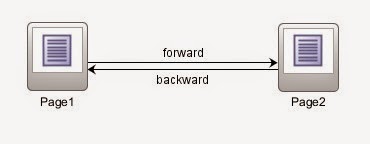
      In this example i am using two jspx pages - Page1 and Page2


      Added two buttons in both pages to navigate between pages
      Source of Page1-

      <af:outputTextvalue="Page 1"id="ot1"inlineStyle="font-size:medium;font-weight:bold;"/>
      <af:commandButtontext="Go To Second Page"id="cb1"action="forward"/>


      Source of Page2-


      <af:outputTextvalue="Page 2"id="ot1"inlineStyle="font-size:medium;font-weight:bold;"/>
      <af:commandButtontext="Go To First Page"id="cb1"action="backward"/>


      Now see JavaScript function to disable back button functionality, In actual JavaScript doesn't disable back button but override it's default functionality
      This function forces browser to navigate forward instead of going back so on click of back button first browser executes it's default back operation but due to this function again navigates to forward and show same page


      function preventBackButton() {
      window.history.forward();
      }

      Add this javascript to Page 1 and invoke using af:clientListener tag on pageLoad


      <af:clientListenermethod="preventBackButton"type="load"/>

      Now run application and check
      Go to second page and the press back button - it returns to page one for a fraction of second but again navigates to Page 2
      It means it is working , Cheers :) Happy Learning

      Searching pivotTable using dvt:pivotFilterBar in Oracle ADF

      $
      0
      0

      dvt:pivotTable-

      From Oracle docs- The Pivot Table supports the display of multiple nested attributes on a row and column header. In addition, the Pivot Table supports the ability to dynamically change the layout of the attributes displayed in the row or column headers via drag and drop pivoting.

      Framework provides  <dvt:pivotFilterBar>component to perform search operation on pivotTable
      The PivotFilterBar component is used to filter data based on the selected criterion belonging to the PivotableQueryDescriptor as specified by the value property

      In this example i am using Departments and Employees table of HR Schema, Created a query based viewObject using this query (to show Departments and it's Employees)


      SELECT A.DEPARTMENT_ID,  
      B.EMPLOYEE_ID,
      A.DEPARTMENT_NAME ,
      B.FIRST_NAME||''||B.LAST_NAME AS NAME,
      B.EMAIL,
      B.PHONE_NUMBER,
      B.HIRE_DATE,
      B.JOB_ID,
      B.SALARY,
      B.COMMISSION_PCT
      FROM DEPARTMENTS A, EMPLOYEES B
      WHERE A.DEPARTMENT_ID=B.DEPARTMENT_ID

      Add this viewObject to Application Module and drop on page as pivot table from Data Control
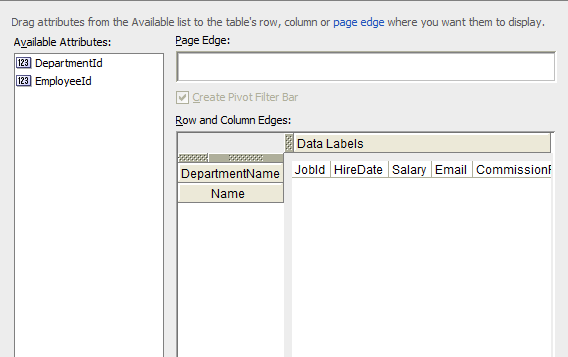
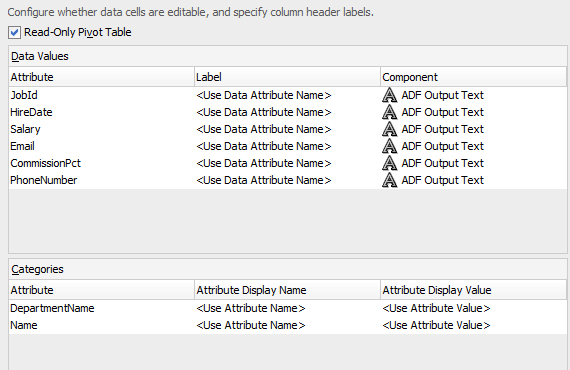
      Configuration for pivotTable-

      Pivot Table data set


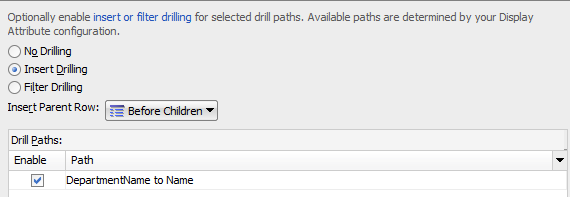
      Pivot Table Drilling

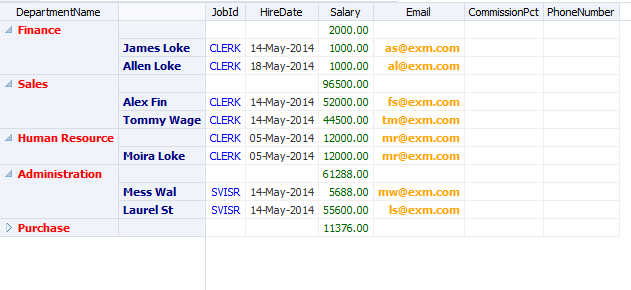
      Finally it looks like this-

      Now i have dropped <dvt:pivotTable> on page and it automatically sets it's properties that are required for filtering pivotTable


      <dvt:pivotFilterBarid="pt1pivotFilterBar"value="#{bindings.DeptEmp1.pivotFilterBarModel}"
      modelName="pt1Model"/>

      Once check that modelName property should be same for both pivotTable and filterbar
      Now run this application and drop any column on filterbar that you want to search

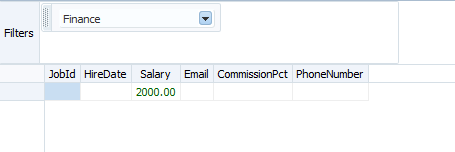
      Pivot Filter bar (Oracle ADF)
      Sample ADF Application-Download
      Cheers :) Happy Learning
      ADF Basics: Disable user input in af:inputListOfValues

      $
      0
      0
      Sometimes we need to disable user input in input Lov as there is requirement of selecting value only from Lov popup

      By default af:inputListOfValues provides feature to select value from popup or type a value as input


      To disable user input there is a property -EditMode
      From Oracle Docs-

      editModeStringYesValid Values: input, select

      the mode that controls how the user specifies a value. This attribute is only applicable when the 'readOnly' attribute is set to false.
      • input: this mode allows the user to type in a value as well as browse and select from a list of available values.
      • select: this mode allows the user only to browse and select from a list of available values.


      Set it's value to select
      Happy Learning , Thanks :)

      Java Database Connectivity- JDBC Tutorial, PreparedStatement, ResultSet

      $
      0
      0
      JDBC is java based API or technology to access data from database and use in Java Desktop or Enterprize application. In short we can say JDBC is an interface between Java and Database, using JDBC you can interact with any of database as Oracle, MySQL, Access.
      JDBC is released with JDK(Java Development Kit)1.1 on 19 Feb 1997 and It is a part of Java Standard Edition. if you know about DBMS(Database Management Systems) then you should know about Database Drivers, drivers are of 4 types.
      1. Type 1 Driver - JDBC-ODBC bridge
      2. Type 2 Driver - Native-API Driver
      3. Type 3 Driver - Network-Protocol Driver(MiddleWare Driver)
      4. Type 4 Driver - Native-Protocol Driver(Pure Java Driver)-Thin Driver
      If you don't have java installed , follow the link below to donload it

      JDK1.7-Download jdk1.7
      Now we will learn that how to implement Database connection in Java. To start with JDBC you must have a little knowledge of DBMS and SQL(Structured Query Language) to interact with Database
      here i will show you that how to connect with Oracle Database
      Follow these steps to connect with Oracle Database

      1. Load Driver (Thin Driver)

      The very first step towards database connection is Loading Driver, as discussed we use pure java driver in JDBC connectivity there are two steps to load driver for connection

      A. Using DriverManager class
      The syntax is - DriverManager.registerDriver(DriverName);


      1.         try{
      2.             DriverManager.registerDriver(new oracle.jdbc.driver.OracleDriver());
      3.            
      4.         }catch(SQLException e){
      5.         }
      6.        

      B. Using Class.Forname class
      The syntax is - Class.forName(”DriverName”);

      1.         try{
      2.              Class.forName("oracle.jdbc.driver.OracleDriver");
      3.            
      4.         }catch(SQLException e){
      5.         }
      6.        


      2. Create Connection


      Connection interface is inside java.sql package and extends Wrapper interface. now to create Connection we register driver with DriverManager class.
      Syntax is- DriverManager.getConnection("url string", "username", "password");

      1.  try{
      2.      DriverManager.registerDriver(new oracle.jdbc.driver.OracleDriver());
      3.      con=DriverManager.getConnection(
      4.      "jdbc:oracle:thin:@192.168.1.234:1521:XE", "hr", "hr");
      5.  }catch(SQLException e){
      6.  }

      You have to change url string with your ip address and SID according to your database setting

      3. Execute PreparedStatement and return Resultset


      Now we see that how to execute SQL query using PreparedStatement and store its result in ResultSet object
      Here i am getting username and password from LOGIN_DET table (you can use your own query here)

      1.         Connection con;
      2.         try{
      3.             DriverManager.registerDriver(new oracle.jdbc.driver.OracleDriver());
      4.             con = DriverManager.getConnection("
      5.            jdbc:oracle:thin:@192.168.1.241:1521:eadf", "hr", "hr");
      6.             PreparedStatement psmt = con.prepareStatement("SELECT * FROM LOGIN_DET");
      7.             ResultSet rs = psmt.executeQuery();
      8.             if(rs.next()){
      9.                 while(rs.next()){
      10.                 System.out.println("Username is--" + rs.getString(1)
      11.                + "and Password is-->" + rs.getString(2) +
      12.                "Email Id is--->" + rs.getString("E_ID"));
      13.                 }
      14.             }
      15.             psmt.close();
      16.             con.close();
      17.         }catch(SQLException e){
      18.         }


      This is the brief overview of using JDBC with Oracle Database, For others you have to change only DriverName respectively
      Happy Learning :)

      ADF Basics: Apply and Change WHERE Clause of ViewObject at runtime programmatically

      $
      0
      0
      This post is about applying or changing WHERE clause of ViewObject programmatically, it can be also used in case we need a specific data(row) from database, suppose you are using Department table of HR Schema and on a button click you need to show records of department id 5

      It means you want to filter viewObject on that particular event, you can do this using setWhereClause mehtod of ViewObjectImpl class.
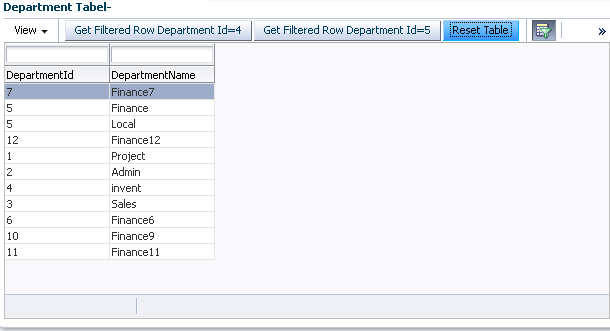
      See the image below , all rows shown in this


      Now when we click the button, it will filter (apply WHERE Clause in Departments ViewObject) rows and refresh ViewObject , returns desired rows.

      For Department_Id 4-


      For Department_Id 5-


      To apply WHERE Clause , see this simple snippet of code

      ViewObject v1 = am.getDepartment1();
      v1.setWhereClause("DEPARTMENT_ID=4"); // Pass Where Clause String as Method Parameter
      v1.executeQuery();

      This code snippet fetch the Row with Deprartment_id=4 and returns back to page. setWhereClause sets the Query's (SQL) Where Clause and doesn't take effect until executeQuery method of ViewObjectImpl is called

      To reset Where Clause we have to set null value in method used

      ViewObject v1 = am.getDepartment1();
      v1.setWhereClause(null); // To Remove Where Clause
      v1.executeQuery();


      Thanks , Happy Learning :)

      Stretch ADF Faces Components to fit browser width (Show as row-column layout- inline block )

      $
      0
      0
      Recently i have seen a thread in OTN about layout of components (How to use components to show a particular layout)
      ADF layout for showing email recipients

      Requirement was simple, user want to show components up to maximum available width (browser window width) first and then move to next line and show other components
      So i thought to document it here :)

      Suppose i have to show 6 images on page (horizontally) , so for that i have used 6 group layout
      one for each image and button
      See xml source-

      <af:panelGroupLayoutid="pgl1"layout="horizontal">
      <af:panelGroupLayoutid="pgl2"layout="vertical"halign="center"
      inlineStyle="padding:2px;">
      <af:imagesource="#{resource['images:a_hobbit_house-wallpaper-1280x800.jpg']}"
      shortDesc="Hobbit House"id="i1"inlineStyle="width:250px;height:200px; "/>
      <af:buttontext="View"id="b1"/>
      </af:panelGroupLayout>
      <af:panelGroupLayoutid="pgl3"layout="vertical"halign="center"
      inlineStyle="padding:2px;">
      <af:imagesource="#{resource['images:beach_at_sunset_3-wallpaper-1440x900.jpg']}"
      shortDesc="Sunset at Beach"id="i2"inlineStyle="width:250px;height:200px; "/>
      <af:buttontext="View"id="b2"/>
      </af:panelGroupLayout>
      <af:panelGroupLayoutid="pgl4"layout="vertical"halign="center"inlineStyle="padding:2px;">
      <af:imagesource="#{resource['images:icelands_ring_road-wide.jpg']}"shortDesc="Ring Road"
      id="i3"inlineStyle="width:250px;height:200px; "/>
      <af:buttontext="View"id="b3"/>
      </af:panelGroupLayout>
      <af:panelGroupLayoutid="pgl5"layout="vertical"halign="center"inlineStyle="padding:2px;">
      <af:imagesource="#{resource['images:road_to_mount_cook-wallpaper-1280x800.jpg']}"
      shortDesc="Road To Mount Cook"id="i4"inlineStyle="width:250px;height:200px; "/>
      <af:buttontext="View"id="b4"/>
      </af:panelGroupLayout>
      <af:panelGroupLayoutid="pgl6"layout="vertical"halign="center"inlineStyle="padding:2px;">
      <af:imagesource="#{resource['images:skyscrapers_reflections-wallpaper-1280x800.jpg']}"
      shortDesc="Skycrappers "id="i5"inlineStyle="width:250px;height:200px; "/>
      <af:buttontext="View"id="b5"/>
      </af:panelGroupLayout>
      <af:panelGroupLayoutid="pgl7"layout="vertical"halign="center"inlineStyle="padding:2px;">
      <af:imagesource="#{resource['images:tufandisli_1387241118_57.jpg']}"shortDesc="Tufan"
      id="i6"inlineStyle="width:250px;height:200px; "/>
      <af:buttontext="View"id="b6"/>
      </af:panelGroupLayout>
      </af:panelGroupLayout>

       and how it looks on page-


      You can see here last image is not appearing properly because total width of all images has crossed maximum available width of browser window
      Now i want to show last image on next line
      So to do this set parent panel group layout to default layout and set display:inline-block for all child panel group layout


      <af:panelGroupLayoutid="pgl1">
      <af:panelGroupLayoutid="pgl2"layout="vertical"halign="center"
      inlineStyle="padding:2px;display:inline-block;">
      <af:imagesource="#{resource['images:a_hobbit_house-wallpaper-1280x800.jpg']}"
      shortDesc="Hobbit House"id="i1"inlineStyle="width:250px;height:200px; "/>
      <af:buttontext="View"id="b1"/>
      </af:panelGroupLayout>
      <af:panelGroupLayoutid="pgl3"layout="vertical"halign="center"
      inlineStyle="padding:2px;display:inline-block;">
      <af:imagesource="#{resource['images:beach_at_sunset_3-wallpaper-1440x900.jpg']}"
      shortDesc="Sunset at Beach"id="i2"inlineStyle="width:250px;height:200px; "/>
      <af:buttontext="View"id="b2"/>
      </af:panelGroupLayout>
      <af:panelGroupLayoutid="pgl4"layout="vertical"halign="center"
      inlineStyle="padding:2px;display:inline-block;">
      <af:imagesource="#{resource['images:icelands_ring_road-wide.jpg']}"shortDesc="Ring Road"
      id="i3"inlineStyle="width:250px;height:200px; "/>
      <af:buttontext="View"id="b3"/>
      </af:panelGroupLayout>
      <af:panelGroupLayoutid="pgl5"layout="vertical"halign="center"
      inlineStyle="padding:2px;display:inline-block;">
      <af:imagesource="#{resource['images:road_to_mount_cook-wallpaper-1280x800.jpg']}"
      shortDesc="Road To Mount Cook"id="i4"inlineStyle="width:250px;height:200px; "/>
      <af:buttontext="View"id="b4"/>
      </af:panelGroupLayout>
      <af:panelGroupLayoutid="pgl6"layout="vertical"halign="center"
      inlineStyle="padding:2px;display:inline-block;">
      <af:imagesource="#{resource['images:skyscrapers_reflections-wallpaper-1280x800.jpg']}"
      shortDesc="Skycrappers "id="i5"inlineStyle="width:250px;height:200px; "/>
      <af:buttontext="View"id="b5"/>
      </af:panelGroupLayout>
      <af:panelGroupLayoutid="pgl7"layout="vertical"halign="center"
      inlineStyle="padding:2px;display:inline-block;">
      <af:imagesource="#{resource['images:tufandisli_1387241118_57.jpg']}"shortDesc="Tufan"
      id="i6"inlineStyle="width:250px;height:200px; "/>
      <af:buttontext="View"id="b6"/>
      </af:panelGroupLayout>
      </af:panelGroupLayout>

      Now it appears like this -

      now again test it by increasing and decreasing browser window width , images and group layout are adjusted as per screen size automatically like a grid view (row and columns)

      Thanks , Happy Learning :)
      Sample ADF Application- Download

      Better UI -Show jQuery notification message (for error, warning, info) in Oracle ADF

      $
      0
      0
      Hello all,
      Another post about using jQuery with ADF Faces , this post is about showing a notification message using jQuery in your ADF Application
      Normally we use default FacesMesage to show error, warning and info messages in ADF

      here i am using jQuery growl library , you can download files from Growl : jQuery Informative Messages Plugin

      Let's see how to integrate this library with ADF Faces, you will get two files from above link
      one is JavaScript file (jQuery script) and other one is CSS file (style-sheet for notification UI)

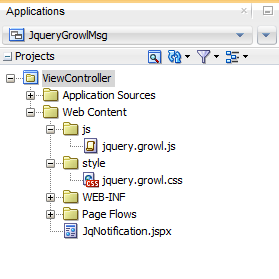
      Add both files to viewController project under Web Content

      now add reference of both files (JS and CSS) in page and also jQuery library to execute growl script


      <af:resourcesource="https://ajax.googleapis.com/ajax/libs/jquery/2.0.2/jquery.min.js"type="javascript"/>
      <af:resourcesource="js/jquery.growl.js"type="javascript"/>
      <af:resourcesource="style/jquery.growl.css"type="css"/>

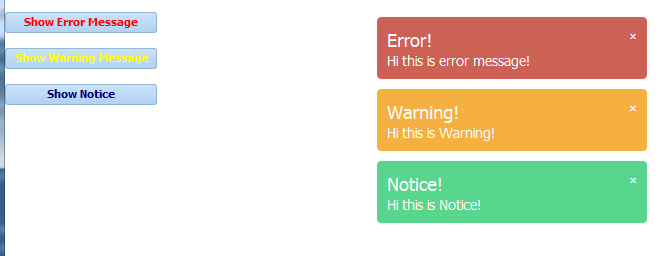
      Now i have added 3 buttons on page to show different messages on button click and created a managed bean to define action for each button
      On button click i have called jQuery script to invoke notification message
      see managed bean code-


      importjavax.faces.context.FacesContext;
      importjavax.faces.event.ActionEvent;

      importorg.apache.myfaces.trinidad.render.ExtendedRenderKitService;
      importorg.apache.myfaces.trinidad.util.Service;

      publicclassShowJqNotification{
      publicShowJqNotification(){
      }

      /**Helper method to execute javascript
      * @param script
      */
      publicvoidcalljqHelper(String script){
      FacesContext context = FacesContext.getCurrentInstance();
      ExtendedRenderKitService erks = Service.getService(context.getRenderKit(), ExtendedRenderKitService.class);
      erks.addScript(context, script);
      }
      //Change your message as per requirement
      /**Method to invoke Error Message
      * @param actionEvent
      */
      publicvoidshowErrMessageAction(ActionEvent actionEvent){
      calljqHelper("$.growl.error({ message: \"Hi this is error message!\" });");

      }

      /**Method to invoke Warnign Message
      * @param actionEvent
      */
      publicvoidshowWarningMessageAction(ActionEvent actionEvent){
      calljqHelper("$.growl.warning({ message: \"Hi this is Warning!\" });");
      }

      /**Method to invoke Info Message
      * @param actionEvent
      */
      publicvoidshowNoticeMessageAction(ActionEvent actionEvent){
      calljqHelper("$.growl.notice({ message: \"Hi this is Notice!\" });");
      }

      }

      All done, now run application and check - how it looks :)


      this is default look of script , you can customize it , just change some parameters in both JS and CSS files
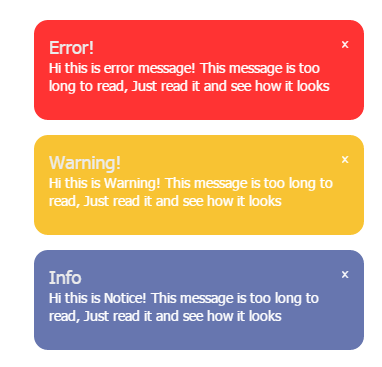
      I have changed some parameters in both files and see how it looks now

      Cheers, Happy Learning :)
      Sample ADF Application- Download

      Read more about - Jquery and ADF Working together

      Image zoom (power zoomer) effect using Jquery in ADF Faces
      Show animated Image Caption using jQuery in ADF Faces
      Using JQuery in Oracle ADF


      Build selectOneChoice to show hierarchical (tree style) data programmatically in ADF

      $
      0
      0
      This post is based on an old article from Frank Nimphius How - to build a select one choice displaying hierarchical selection data

      This article is about showing tree structure data in af:selectOneChoice component using ADF BC , it makes use of tree binding and af:forEach
      Same concept i have used to populate data from managed bean using List data structure

      Let's see the implementation part - how to populate tree style selectOneChoice programatically ?

      First we have to design a Java Bean class in such a way that it can hold  master -detail type of data

      A class that represents a List for Parent Values
                                ======> A list of same type to hold Child Values

      See bean class code-

      importjava.util.ArrayList;
      importjava.util.List;

      publicclassSeasons{
      publicSeasons(String name){
      this.name= name;// To Store Header Values (Storing Seasons Name :))
      }
      // Season and Charater Name
      private String name;
      // To Store Detail Values (Storing Season's Charatcers)
      private List<Seasons> characters =new<Seasons>ArrayList();

      publicvoidsetCharacters(List<Seasons> empDet){
      this.characters= empDet;
      }

      public List<Seasons>getCharacters(){
      return characters;
      }


      publicvoidsetName(String name){
      this.name= name;
      }

      public String getName(){
      return name;
      }
      // This methods directly add characters value in list
      publicvoidaddCharaters(Seasons employee){
      characters.add(employee);
      }
      }

      Now how to use this bean in managed bean to add records, i have written code in constructor to populate values on class load


      // Master List to populate data in selectOnce choice
      List<Seasons> seasonList =new ArrayList<Seasons>();

      publicvoidsetSeasonList(List<Seasons> seasonList){
      this.seasonList= seasonList;
      }

      public List<Seasons>getSeasonList(){
      return seasonList;
      }
      //Constructor of Managed Bean to populate data on page load (you can move this code )
      publicTreeStyleLovBean(){
      super();
      // Creating tree for Seasons and Characters details
      // Adding Master Values (seasons)
      Seasons season1 =new Seasons("Game of Thrones");

      // Adding Detail Values (Child Node-Characters)
      Seasons character =new Seasons("Tywin Lannister");
      season1.addCharaters(character);
      character =new Seasons("Tyrion Lannister");
      season1.addCharaters(character);
      character =new Seasons("Jaime Lannister");
      season1.addCharaters(character);
      character =new Seasons("Cersie Lannister");
      season1.addCharaters(character);
      character =new Seasons("Ned Stark");
      season1.addCharaters(character);

      // Adding Master Values (seasons)
      Seasons season2 =new Seasons("Arrow");

      // Adding Detail Values (Child Node-Characters)
      character =new Seasons("Oliver Queen");
      season2.addCharaters(character);
      character =new Seasons("Moira Queen");
      season2.addCharaters(character);
      character =new Seasons("Laurel Lance");
      season2.addCharaters(character);
      character =new Seasons("Sara Lance");
      season2.addCharaters(character);

      // Adding Master Values (seasons)
      Seasons season3 =new Seasons("Vikings");

      // Adding Detail Values (Child Node-Characters)
      character =new Seasons("Ragnar Lothrak");
      season3.addCharaters(character);

      // Adding Master Values (seasons)
      Seasons season4 =new Seasons("The Flash");

      // Adding Detail Values (Child Node-Characters)
      character =new Seasons("Barry Allen");
      season4.addCharaters(character);
      character =new Seasons("Harisson Wells");
      season4.addCharaters(character);
      character =new Seasons("Iris West");
      season4.addCharaters(character);
      character =new Seasons("Joe");
      season4.addCharaters(character);

      // Adding all list to topList
      seasonList.add(season1);
      seasonList.add(season2);
      seasonList.add(season3);
      seasonList.add(season4);

      }
      how to bind this managed bean to selectOneChoice ? i have used same concept as described in Frank's article using af:forEach


      <af:selectOneChoiceid="selectBox"label="Choose Character"valuePassThru="true"
      styleClass="employeeSelectBox"contentStyle="width:150px;"
      binding="#{viewScope.TreeStyleLovBean.selectOneValueBind}">
      <af:forEachitems="#{viewScope.TreeStyleLovBean.seasonList}"var="seasonNm">
      <af:selectItemlabel="#{seasonNm.name}"disabled="true"id="si1"/>
      <af:forEachitems="#{seasonNm.characters}"var="characterNm">
      <af:selectItemlabel="#{characterNm.name}"value="#{characterNm.name}"id="si2"/>
      </af:forEach>
      </af:forEach>
      </af:selectOneChoice>

      you can see here that first forEach is populated from master list and iterates over list of seasons and first selectItem show season's name
      the inner forEach makes used of character list that is defined in Java Bean class and stores season wise character's name
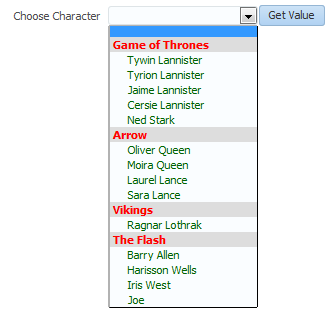
      Rest is same - a CSS is used to differentiate color and alignment of parent and child records (same as Frank's article)


      <f:facetname="metaContainer">
      <af:group>
      <![CDATA[
      <style>
      .employeeSelectBox option{text-indent:15px;color:darkgreen;}
      .employeeSelectBox option[disabled]{color:red; background-color:#dddddd;
      font-weight: bold; text-indent:0px}
      </style>
      ]]>
      </af:group>
      </f:facet>

      Now run this application - see how it appears on page


      It looks quite good :) to get selected value in bean just use componentBinding.getValue();

      Sample ADF Application-Download (Jdev 12.1.3)
      Cheers , Happy Learning 

      ADF Skinning : Remove "search" or "more" link from af:inputComboboxListOfValues in ADF Faces (Jdev 12.1.3)

      $
      0
      0
      Hello all,

      This post is about a small CSS trick that may be useful sometimes

      we often use af:inputComboboxListOfValues to show large amount of data as List of Values
      From Oracle Docs-
      The inputComboboxListOfValues component allows a user to open a choice list and select from a list of values, in order to populate the LOV field (and possibly other fields) on a page.
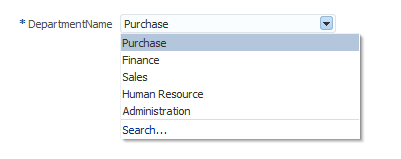
      Users can either select a value from the list in the dropdown panel or click the "Search..." link at the bottom of the panel to launch the "Search and Select" dialog. The dialog enables users to search for specific values and select the desired value that should go into the LOV field on the base page. The choice list when opened could display various items in the following order with separators between each (if applicable).


      Have a look at this -
       here you see a link "more" on click this link a search dialog box appears , when you define a search criteria in lov at model level then this link appears as "search"


      So to remove this link from combobox use this CSS

      af|inputComboboxListOfValues::search{
      display:none;
      }

      Now look at combo box , we are done


      Also Check how to configure ADF Skin in Application - ADF Basics: Using CSS to change appearance of application (Skins and Styles in ADF Faces)

      Cheers :)
      Happy Learning

      ADF Skinning : Change color and style of af:query buttons in ADF Faces (Jdev 12.1.3)

      $
      0
      0
      Hello All,

      This is another post about ADF Skinning , in this post i am going to show you that how can we change button's style in af:query component
      Actually this is very easy , if we define some styles for af:button component in our css file then it will be applicable on af:query's buttons (Search, Reset, Advanced, Save etc) too

      Suppose i have defined this in css file

      af|button{
      color:navy;
      font-weight:bold;
      }
       

      Now it will change color of all buttons of application including af:query
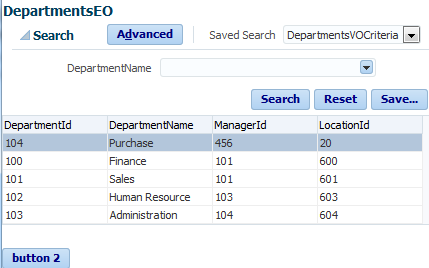
      See this snap after applying this skin


      But if you have a requirement to use different style in af:query buttons or you don't want to change color of all buttons
      Then it is not that much easy as it seems

      There is a selector to style buttons of af:query - af|query::button 
      But this works only if buttons are af:commandButton not af:button
      See from docs-

      af|query::button Styles the buttons of the query component. Note that this skin selector is only present when the skin selector -tr-button-type is set to 'old', and the query buttons are rendered as af:commandButtons. When the -tr-button-type is set to 'unified', the query buttons are rendered as af:buttons and have the default stylings for af:button applied, so that query buttons have the same look and feel as all other buttons. Tip: If you skin this selector's background-image, you may also want to skin it for :hover, :active, :focus. The :disabled state is currently not supported. Please note that for buttons :active and :focus pseudo-classes do not work in IE7. IE7 also does not allow disabled buttons to be styled. It is recommended that you use the .AFButton*:alias selectors as a shortcut to skin all button components the same.

      So for this first i have to change -tr-button-type selector to old so that i can use af|query::button
      Now see the css


      af|query {
      -tr-button-type: old;
      }
      af|query::button {
      color:red;
      font-weight:bold;
      }

      af|query::button:hover {
      color: Orange;
      font-weight:bold;
      }

      af|query::button:focus {
      color:maroon;
      font-weight:bold;
      }

      af|button{
      color:navy;
      font-weight:bold;
      }

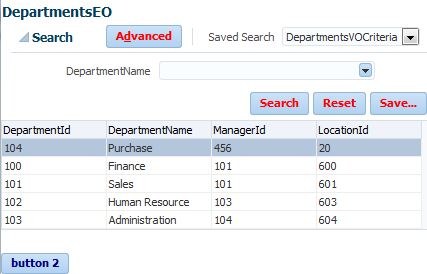
      Check the output-

      To use specific style for af:query you can create styleClass in css file and put this in styleClass property of af:query
      Suppose i have two af:query components on page and i want to use different style for both
      For this i have define two different styleClass in css file like this-


      af|query {
      -tr-button-type: old;
      }
      .mystyle1af|query::button {
      color:red;
      font-weight:bold;
      }

      .mystyle2af|query::button {
      color:darkgreen;
      font-weight:bold;
      }

      and on page put myStyle1 in styleClass property of first af:query component and myStyle2 in second af:query
      See how it looks now -


      Cheers, Happy Learning  ☺

      Get Value from programmatically created components , Iterate over parent component to get child values in ADF Faces

      $
      0
      0
      Sometimes we need to create and add ADF Faces components at runtime , we can do it programmatically
      I have posted about this before
      Creating dynamic layout (form and UI Component) using ADF Faces

      Now this post talks about getting value from programmatically created component, means when user enters value in those component then how to access that value in managed bean

      Here i am using Jdev 12.1.3 , Let's see the implementation part

      Created a page and added two buttons , one to create component at run time and second one to get values from those components
      See page XML source code -

      <af:documenttitle="ProgComponent.jspx"id="d1">
      <af:formid="f1">
      <af:spacerwidth="10"height="10"id="s3"/>
      <af:buttontext="Create Components "id="b1"
      actionListener="#{viewScope.GetValueProgCompBean.createComponentsAction}"/>
      <af:spacerwidth="10"height="10"id="s1"/>
      <af:buttontext="Get Value"id="b2"
      actionListener="#{viewScope.GetValueProgCompBean.getValueOfCompAction}"/>
      <af:panelGroupLayoutid="pgl1"layout="vertical"
      binding="#{viewScope.GetValueProgCompBean.parentGroupBind}">
      <af:spacerwidth="10"height="10"id="s2"/>
      </af:panelGroupLayout>
      </af:form>
      </af:document>

      To create components at run time i have used same approach described in above blog post
      Check the code written on Create Components button

      importjavax.faces.component.UIComponent;
      importjavax.faces.event.ActionEvent;

      importoracle.adf.view.rich.component.rich.input.RichInputText;
      importoracle.adf.view.rich.component.rich.layout.RichPanelGroupLayout;
      importoracle.adf.view.rich.context.AdfFacesContext;


      //Binding of panel group layout , it will be parent of prog. created components
      private RichPanelGroupLayout parentGroupBind;

      publicvoidsetParentGroupBind(RichPanelGroupLayout parentGroupBind){
      this.parentGroupBind= parentGroupBind;
      }

      public RichPanelGroupLayout getParentGroupBind(){
      return parentGroupBind;
      }

      /**Method to add child components to parent
      * @param parentUIComponent
      * @param childUIComponent
      */
      publicvoidaddComponent(UIComponent parentUIComponent, UIComponent childUIComponent){
      parentUIComponent.getChildren().add(childUIComponent);
      AdfFacesContext.getCurrentInstance().addPartialTarget(parentUIComponent);
      }

      /**Method to create Input text at run time
      * @param actionEvent
      */
      publicvoidcreateComponentsAction(ActionEvent actionEvent){
      //Create an Object of desired UI Component
      RichInputText ui =new RichInputText();
      //Set properties
      ui.setId("rit1");
      ui.setLabel("Input text 1");
      ui.setContentStyle("font-weight:bold;color:red");
      //Now add this component to any parent component
      addComponent(getParentGroupBind(), ui);

      RichInputText ui1 =new RichInputText();
      ui1.setId("rit2");
      ui1.setLabel("Input text 2");
      ui1.setContentStyle("font-weight:bold;color:red");
      addComponent(getParentGroupBind(), ui1);
      }

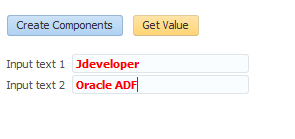
      Now run application and click on button , you will see two inputText are created


      Now to get value of these components follow the steps
      1. Get Parent layout
      2. Iterate over parent to get all child components
      3. Get Value of every child

      See the code written on get value button in managed bean

      /**Method to Iterate over parent and get value of all child components
      * @param actionEvent
      */
      publicvoidgetValueOfCompAction(ActionEvent actionEvent){
      RichPanelGroupLayout PF = getParentGroupBind();// Get Parent Layout
      List<UIComponent> listcomp = PF.getChildren();// Get all child
      Iterator iter = listcomp.iterator();// Create an Iteraotr to iterate over childs
      while(iter.hasNext()){
      UIComponent comp =(UIComponent) iter.next();// Get next Child Component
      System.out.println("Component is-"+ comp +" and value is-"+
      comp.getAttributes().get("value"));//Get Component detial and it's value
      }
      }

      Again check , enter value in both inputText and click on button to get value


      Output on console-

      Sample ADF Application- Download
      Cheers :) Happy Learning

      Apply ActionListener to programmatically created buttons/link in ADF

      $
      0
      0

      This post is next in series of "Working with ADF Faces Components programmatically"
      Previous posts are-
      Creating dynamic layout (form and UI Component) using ADF Faces
      Get Value from programmatically created components , Iterate over parent component to get child values in ADF Faces

      Now this post is about applying ActionListener to a programmatically created button or link
      Let's start (Jdev 12.13) -

      • First created a FusionWebApplication and a page in viewController project
      • Dropped a button on page , on this button action i will create a link programmatically and assign actionListener to it
      • To create new link i have added following code (described in previous posts)

      • /**Method to add dynamically created component to a parent layout
        * @param parentUIComponent
        * @param childUIComponent
        */
        publicvoidaddComponent(UIComponent parentUIComponent, UIComponent childUIComponent){
        parentUIComponent.getChildren().add(childUIComponent);
        AdfFacesContext.getCurrentInstance().addPartialTarget(parentUIComponent);
        }

        //Creating Link programmatically on button click     
        RichLink ui =new RichLink();
        ui.setId("li1");
        ui.setText("Programmatically Created Link");
        ui.setInlineStyle("font-weight:bold;");
        //Add this link to parent form layout
        //ParentGroupLayoutBind is the component binding of panelGroupLayout
        addComponent(getParentGroupLayoutBind(), ui);

      • After this we are able to create a new Link on click of button, now next is to assign ActionListener to this Link
        For this first i have to define an ActionListener method in bean. So i have added this 

      • /**Action Listener to be applied on dynamically created button
        * @param actionEvent
        */
        publicvoidactionForProgLink(ActionEvent actionEvent){
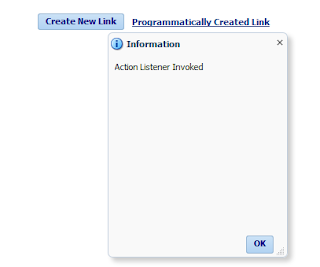
        FacesMessage infoMsg =new FacesMessage("Action Listener Invoked");
        infoMsg.setSeverity(FacesMessage.SEVERITY_INFO);
        FacesContext.getCurrentInstance().addMessage(null, infoMsg);
        }

      • Now how to assign this ActionListener to that dynamically created Link?
        See the Code-

      • /**Method to to resolve actionListener
        * @param actionName
        */
        private ActionListener getActionListener(String actionName){
        //here Testbean is the name of ManagedBean
        MethodExpression methodExp = getMethodExpressionForAction("#{viewScope.Testbean."+ actionName +"}");
        returnnewMethodExpressionActionListener(methodExp);
        }

        Helper method to resolve ActionListener-

        private MethodExpression getMethodExpressionForAction(String actionName){
        Class[] argtypes =new Class[1];
        argtypes[0]= ActionEvent.class;

        FacesContext facesCtx = FacesContext.getCurrentInstance();
        Application app = facesCtx.getApplication();
        ExpressionFactory elFactory = app.getExpressionFactory();
        ELContext elContext = facesCtx.getELContext();
        return elFactory.createMethodExpression(elContext, actionName,null, argtypes);
        }

        Just pass the name of method to resolve it

        //Apply ActionListener on this dynamically created link 
         ui.addActionListener(getActionListener("actionForProgLink")); 
         
      Now time to check , run application :)
      First a button appears-


      On click of this button a link is created -

      Click on this link- programmatically assigned Action Listener is called

      Cheers , Happy Learning :)
      Viewing all 165 articles
      Browse latest View live